Ribs are too deep
Stop widening the groove. Lightly bevel the neighboring ridge so the shadow becomes part of a broader rib.
A field guide for small, good things
Seasonal project / Halloween edition
07 Seasonal / Beginner · Easy
Turn one firm soap bar into a squat, ribbed pumpkin with a little stem and an optional jack-o'-lantern face. This beginner-friendly Halloween soap carving keeps the cuts shallow, the silhouette sturdy, and the mood pleasantly un-fussy.
Promise In 25 minutes, you will have a small seasonal pumpkin with readable ribs, a flat base, and enough personality to sit on a shelf or become a tiny autumn gift.
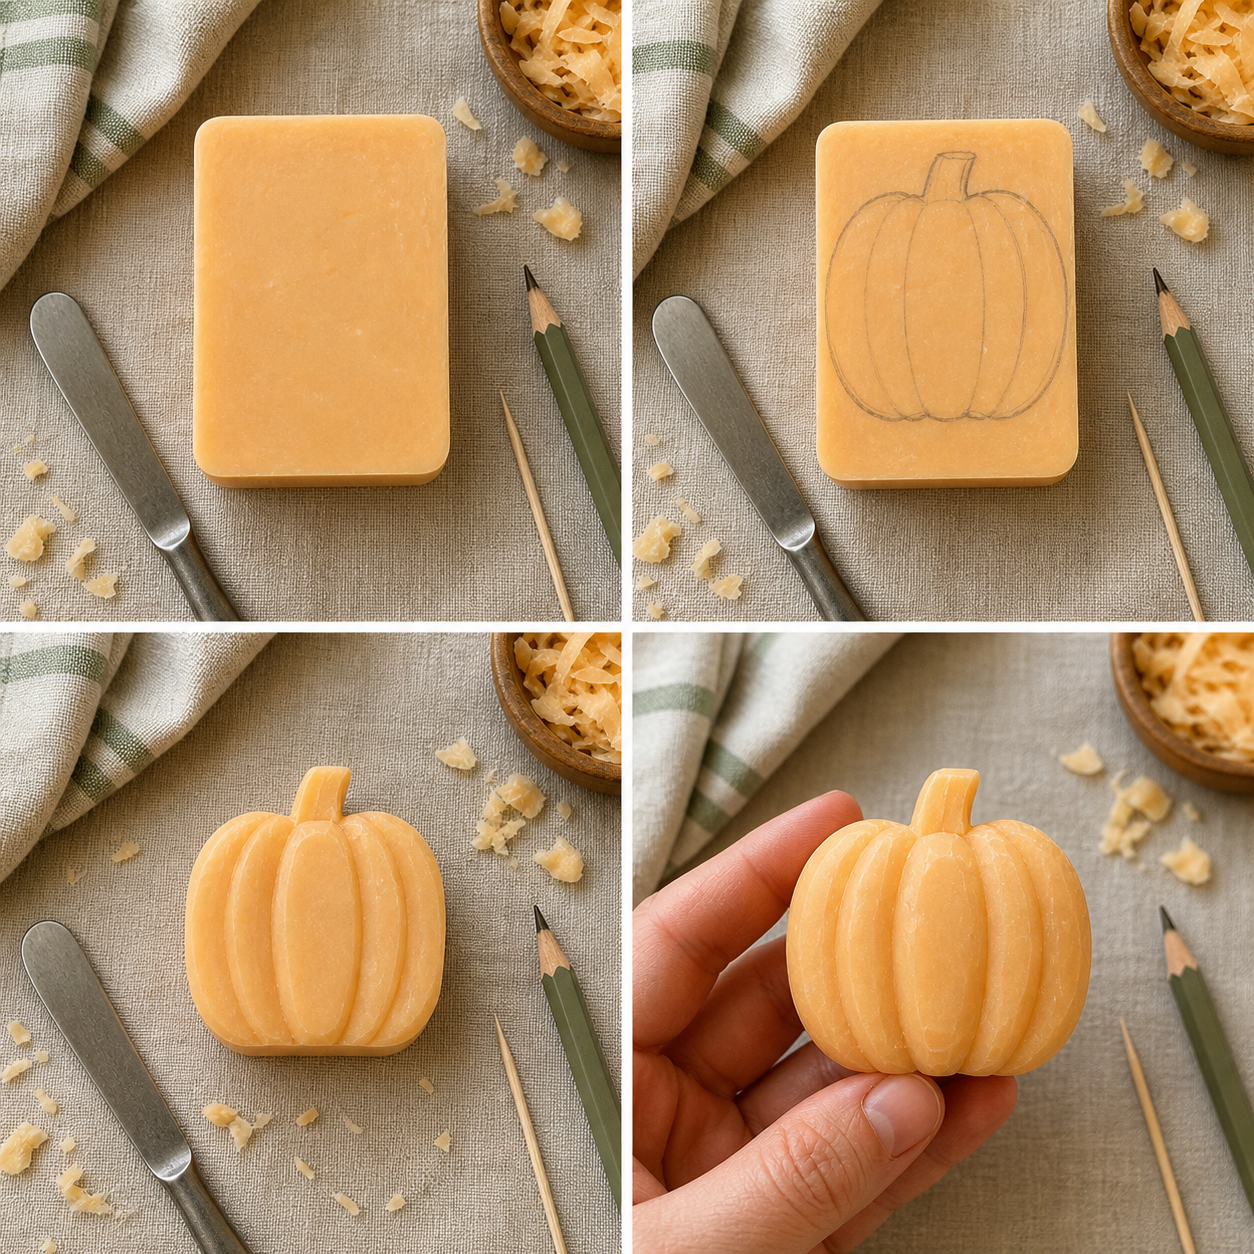
01 Gather / set the season
Choose a dry, room-temperature bar that holds a corner when pressed. Pale or unscented soap makes the pencil map easy to see, but any firm, non-crumbly bar can become a pumpkin.
Test one curl on the underside before mapping the oval. If the surface powders, use shorter passes and keep the ribs broad; if it smears, wipe the bar and let it dry before you continue. A bar with one broad face is easiest to shape, while a very thin bar may work better as a small pumpkin with three or four ribs. Save the cleanest corner for the stem until the body is stable.
Dry, plain, and easy to replace.
For shallow cuts and bevels.
To map the oval and ribs.
For a stem and optional face.
Grip underneath; catch chips.
02 The four decisions
Work from plain bar to finished pumpkin: map the body, remove the corners, carve the shadows, then add only the face your soap can support.
Start with the plain bar
Lay the bar flat and sketch an oval on its broad face, filling about two thirds of the surface. Flatten the bottom in the drawing and leave a small top notch for the stem. Add five or six loose vertical lines for the ribs. Keep the map light; it is a guide, not a tattoo.
Round the block
Use the rounded knife edge in short, shallow passes outside the pencil line. Turn the soap after every few cuts so both shoulders develop together. Keep the base broad and flat, and leave the center thick. Stop when the silhouette reads as a low pumpkin before you touch the grooves.
Build the ribbed body
On each marked line, make a shallow V-shaped groove from crown to base, alternating sides as you go. Leave every ridge wide and connected; do not undercut beneath it. Use a little saved soap at the top for a short stem, then soften its corners with the knife or toothpick.
Finish the seasonal detail
Check that the pumpkin sits without rocking and make one light pass around the rim. For a Halloween finish, score two small triangles and a short smile with the toothpick; press lightly and never cut through the face. Brush away chips, let the soap air-dry overnight, and stop while the ribs still look strong.
Form note / seasonal shape
A pumpkin is easy to read because three signals agree: a low oval, repeating vertical ribs, and a small stem. Let the width exceed the height so the piece feels grounded, and keep the base flatter than the top. The ribs are shadows rather than separate slices, so each ridge should stay broad and connected through the center of the body.
Use five or six ribs on a broad bar, or fewer on a small one. Keep the stem short—no more than a small crown above the body—and leave the front face inside the strongest central ribs. If the body is already narrow, skip the jack-o’-lantern face or use one simple smile. A clear seasonal silhouette is more useful than detail the soap cannot support.
03 When the bar answers back
A pumpkin does not need perfect symmetry. Most trouble comes from digging one groove too deep or correcting a lopsided side too quickly. Pause, rotate the bar, and make the next cut answer the shape you already have.
If the face or a rib leaves a loose flake, brush it away before judging the result. Smooth the break into the nearest curve, then check that the pumpkin still sits flat. The cleanest recovery is usually one wider shadow or a simpler face, not another narrow cut.
Stop widening the groove. Lightly bevel the neighboring ridge so the shadow becomes part of a broader rib.
Do not hollow the fuller side. Shave one shallow pass from its outer shoulder, then check the base again.
Brush it clean and keep only the strongest mark. A pumpkin reads through its oval and ribs even without eyes.
05 Questions from the bench
Choose a firm, plain bar that holds its corners when you press it lightly. Unscented or lightly scented soap is easiest to work with. Avoid wet, waxy, translucent, or crumbly bars, which can smear instead of giving you a clean curl.
Five or six broad ribs are plenty for a small bar. Space them by eye and keep the grooves shallow enough that each ridge stays strong. A few clear shadows read better than many narrow lines.
Yes. Add two small eyes and a short mouth after the body is stable, using a toothpick with very light pressure. Keep the marks shallow and decorative; carving through the face can weaken the pumpkin and make the soap fragile.
Flatten the base with one or two light passes before adding more detail. If a crack appears near a rib, stop cutting there and turn it into a wider groove or part of the face. Let the finished piece dry on the towel overnight.
Yes. Keep the same low silhouette and change the proportions: make a taller oval for a small squash, use fewer ribs for a simpler gourd, or leave off the face for a quiet autumn piece. Preserve a flat base and a broad rim in every version, then add the stem only after the body can stand securely.
06 Next on the shelf
For more seasonal soap carving ideas, follow the pumpkin with a graphic snowflake, or switch to a quieter silhouette when you want a quick win.
View the full project shelf ↗