01 Before the first petal
Choose a flower that fits the bar.
This soap carving flower tutorial starts with the subject’s useful visual language: a center, an outside edge, and a rhythm that repeats. You can suggest a blossom with only a few shapes if those relationships remain clear.
Before you copy a reference image, look at the material. A rectangular bar is naturally suited to a broad relief: a sunflower with a strong center, a lotus seen from above, or a simple five-petal graphic. A layered rose asks for more depth because each ring needs a ledge and a place to catch light. Both approaches work, but they ask the soap to carry different kinds of structure.
keep one broad center so the relief stays joined
shallow rings can suggest many petals
large outer turns are kinder than tiny points
For a first flower, choose a plain, firm bar with clean corners and test a spare edge. If the curl comes away in a ribbon, you have a useful starting material. If it powders, smears, or needs force, change the bar or choose a simpler relief before you draw a detailed bloom. The best soap for carving guide explains how to read that first test.
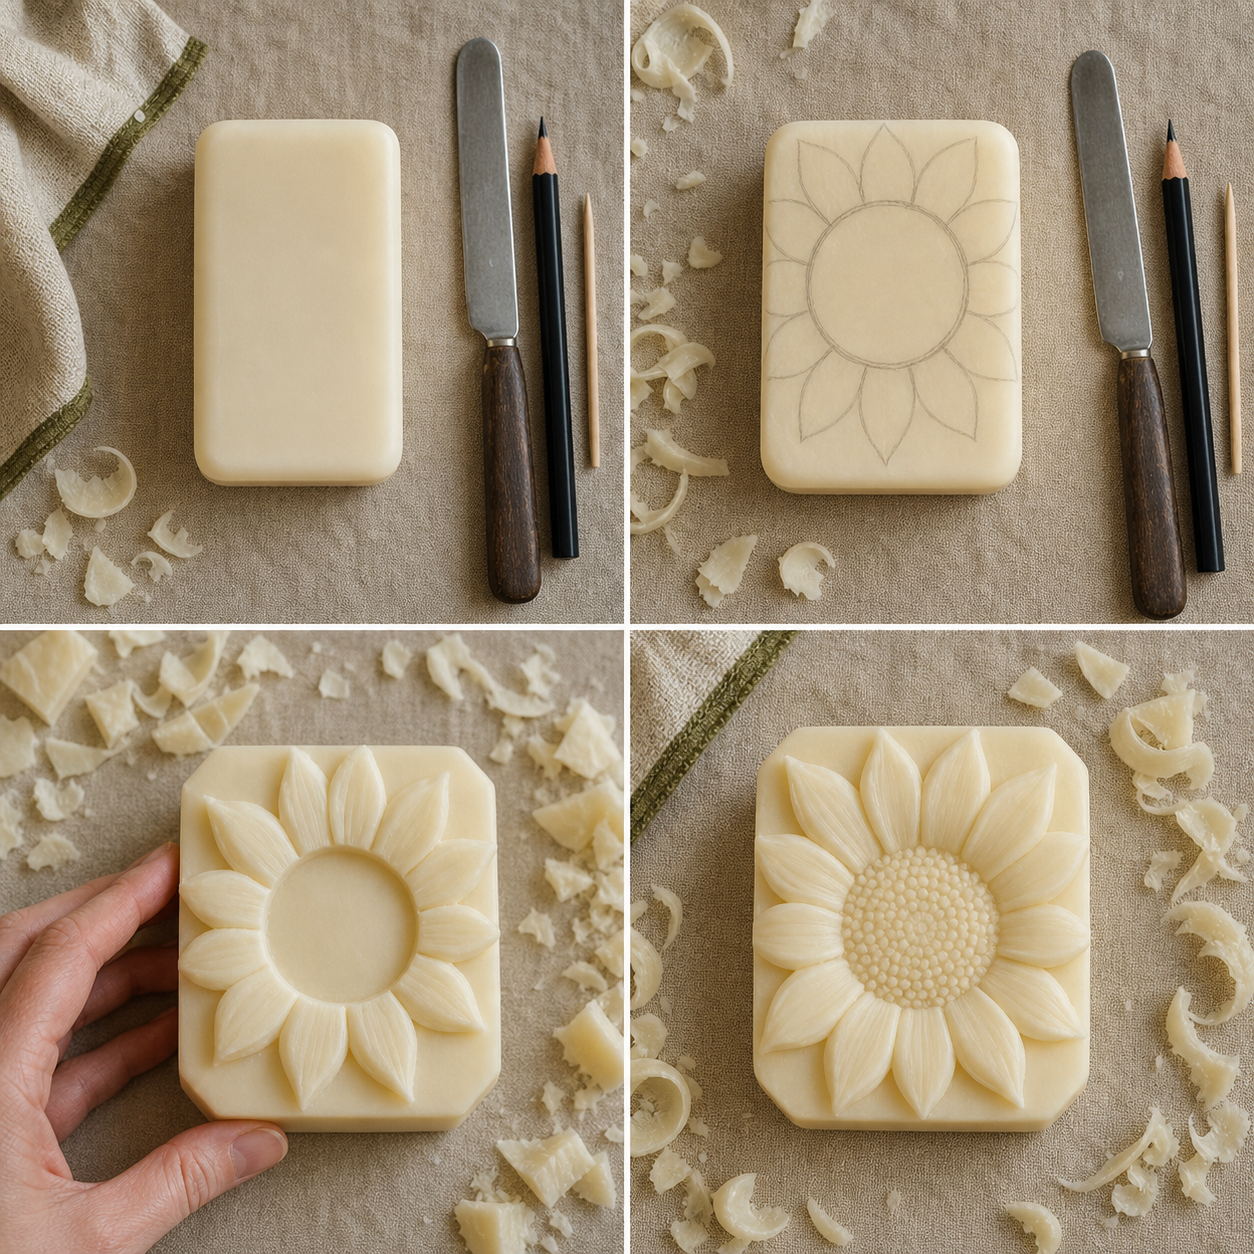
A strong center makes the form readable before any small texture is added.
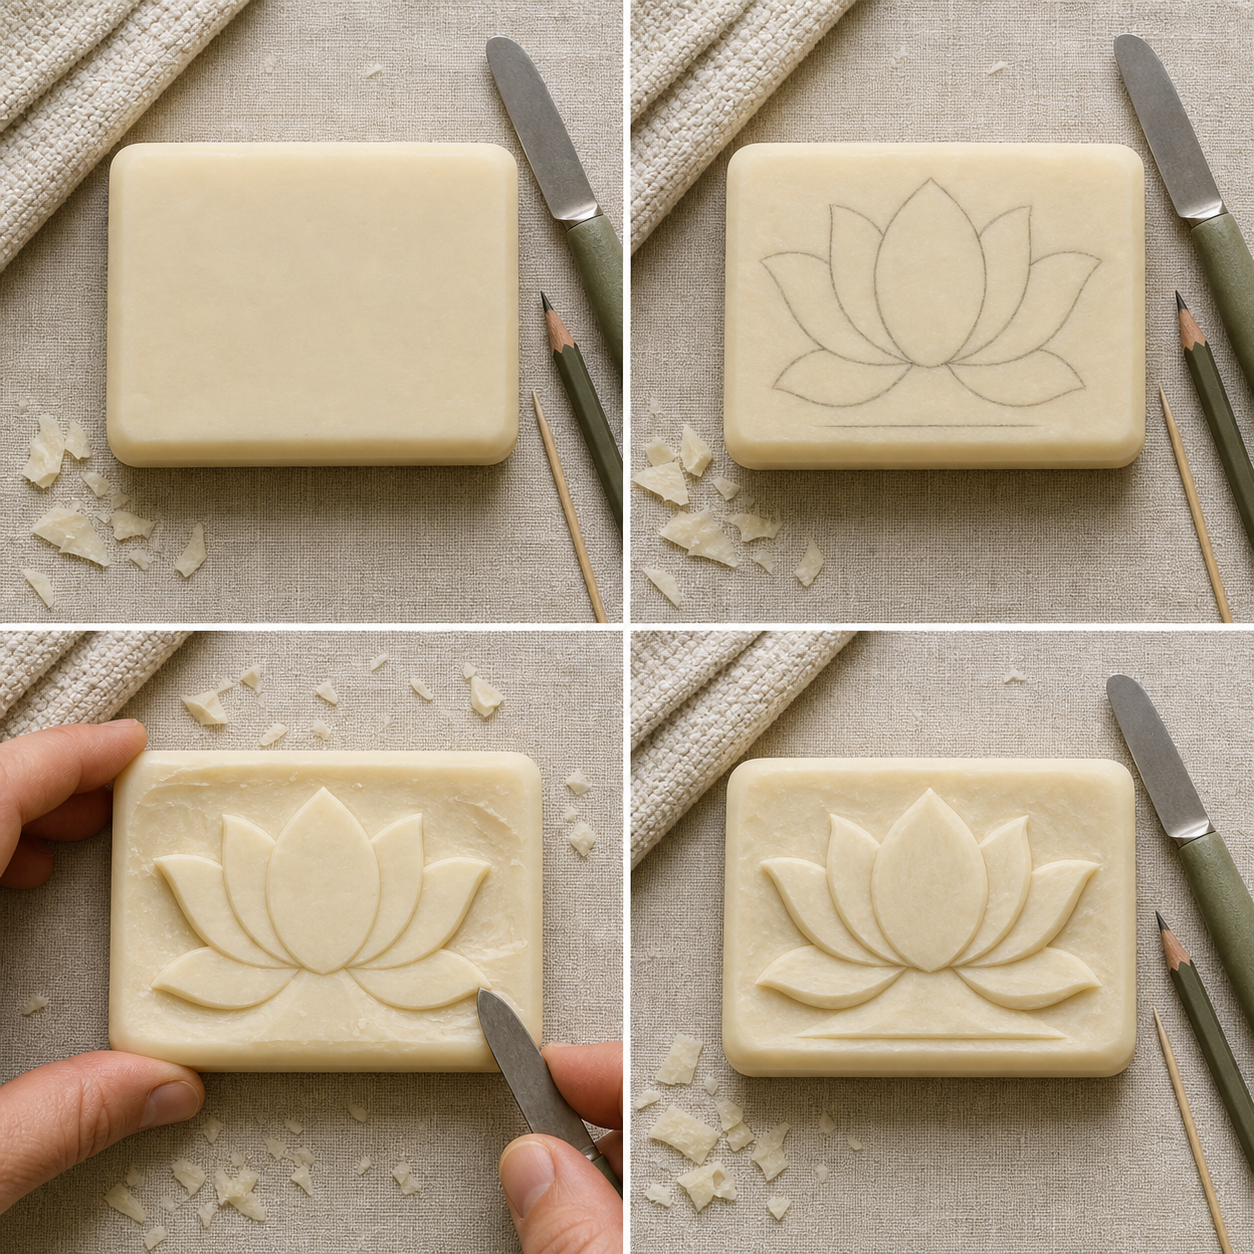
Build a low profile and lower the channels between petals one careful pass at a time.
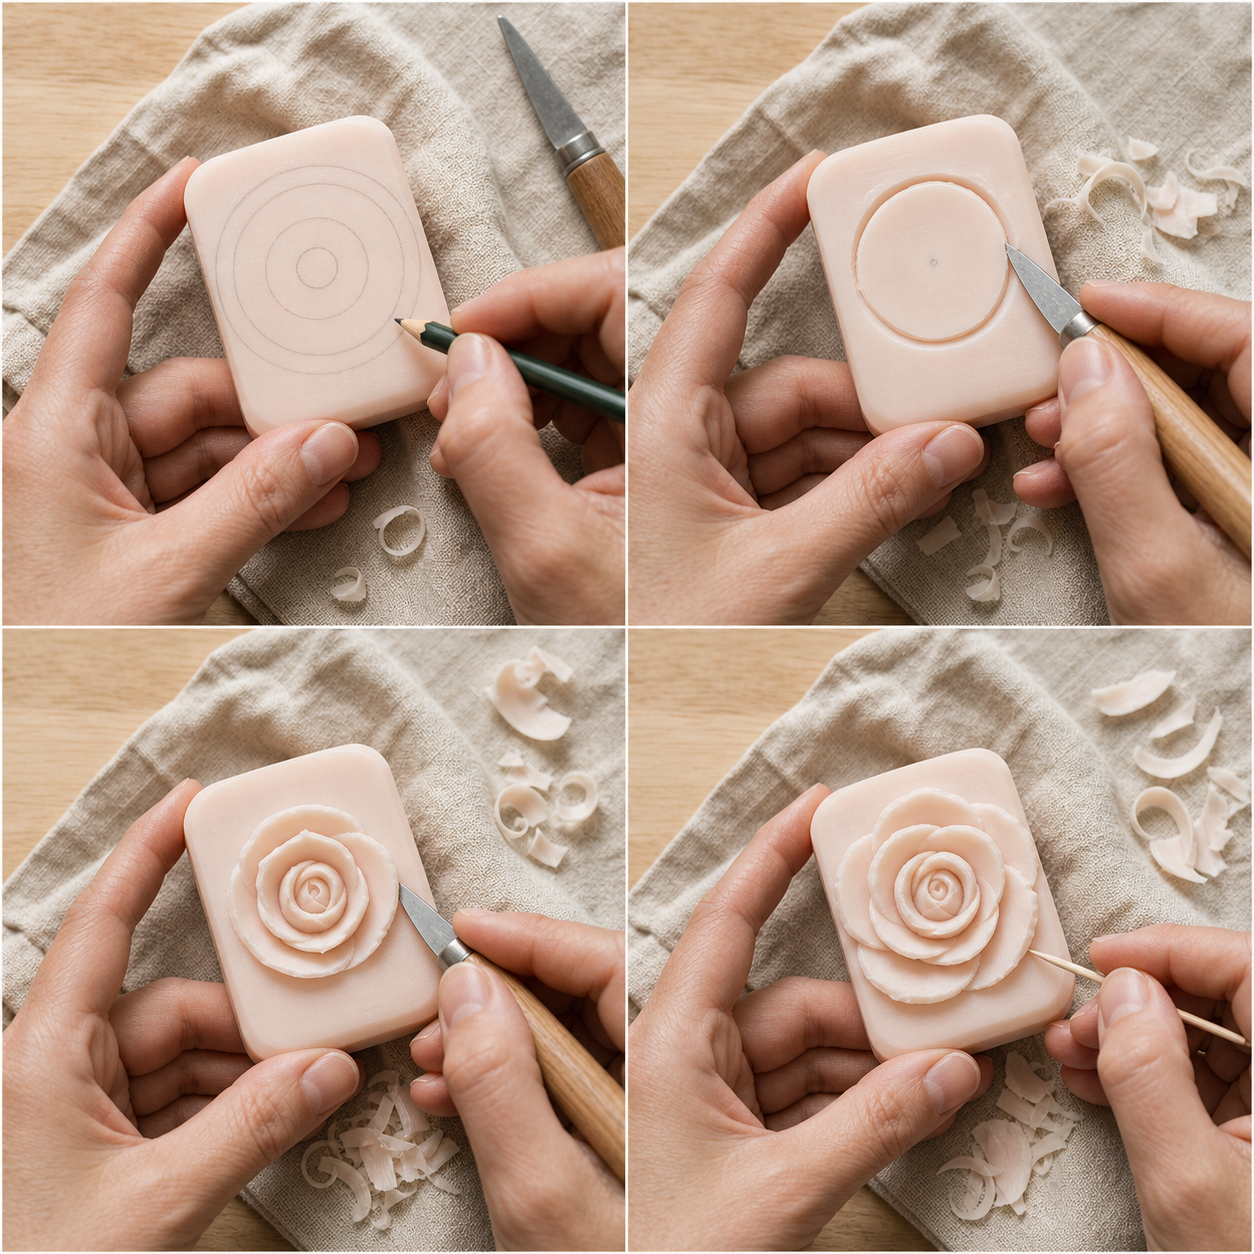
Three readable rings can create depth without asking every petal to stand alone.
02 Four botanical routes
Pick the flower that teaches the right thing.
These projects are not four versions of the same tutorial. Each one gives the bar a different job, so you can choose between a quick graphic result, a quiet outline exercise, or a more patient study of overlapping forms.
Begin with a leaf.
The easiest botanical starting point. Draw one broad shape, remove the background, and add a single vein. It teaches the same decisions a flower needs without making the center or petals fragile.
Try a sunflower.
Choose this when you want a flower that reads from across the table. Make the center stable, keep the petals wide, and let repeated shallow marks add energy only after the outline is sound.
Make a lotus.
The lotus is a good bridge between a flat drawing and a layered flower. Work outward from the center, leave the outside petals thick, and think in shadows rather than deep separations.
Study a rose.
Pick the rose when the pleasure is in a slow, curved sequence. Three rings are enough to show the idea; add another only if the bar remains sturdy from the side.
There is also value in repeating a familiar flower with a different bar. A firm opaque soap will make the edges and shadows clear. A softer bar may encourage broader, more forgiving shapes but blur narrow channels. Repeating the same design once is not wasted time; it tells you whether the change came from the drawing, the tool, or the material.
03 From circle to relief
Build petals without making them fragile.
The safest way to make a soap flower is to work from large relationships to small marks. Treat the first pass as a map. Depth comes later, and only where a shadow will help the flower read.
Find the center
Mark one quiet anchor.
Place a small dot or circle near the middle of the broadest face. It does not have to be mathematically centered, but it should leave enough material on every side. This is the part that holds the petals together when the outer edges become thinner.
Draw the outside
Give the bloom breathing room.
Sketch the outside silhouette before you draw individual petals. Five broad turns can read as a flower more clearly than twelve narrow points. Leave a border around the shape so a wandering line can be absorbed without cutting into the edge of the bar.
Lower the spaces
Carve the channels, not the petals.
Use shallow cuts between petals and around the center. Let the raised areas stay broad. A channel is successful when it creates a small change of light; it does not need to be deep enough to separate the forms completely.
Repeat with restraint
Add one helpful line at a time.
After the relief reads, add a center mark, a short vein, or a few curved lines. Keep the marks following the flower’s direction. Stop if the surface begins to powder or if the new detail does not make the silhouette easier to understand.
Check the side
Leave the base doing its job.
Turn the bar and look at the thickness beneath the flower. A low relief should still have a broad back. If a petal is becoming a thin flap, soften it into the neighboring shape rather than trying to preserve an isolated edge.
For a graphic flower
Use broad petals, a strong center, and a few repeated marks. The sunflower is a useful example because the design stays readable even when the surface keeps a handmade facet.
For a layered flower
Lower each ring gradually and keep the base thick. The rose and lotus work because their shadows do more of the describing than their smallest cuts.
Need a pattern before you draw?
Use a printable outline, then simplify it to match the bar in your hand.
04 After the last cut
Let the flower keep its shadow.
The finish is part of the design. A soap flower is usually more convincing when you keep a little texture and let the relief make its own contrast, rather than polishing every surface until the edges disappear.
Dry first.
Keep the carving away from splashes, steam, direct heat, and a closed damp container. A breathable dish gives the base a chance to settle.
Photograph the layers.
Take one top view and one side view. The side image records the depth and strength that a flat photograph cannot explain.
Keep the story.
Write down the bar, the tool, and the moment the petals began to soften. That note helps the next flower start with better material.
Do not treat the finished flower as a bathroom bar after you have invested in the form. Soap remains water-soluble, so the object is best kept as a dry study or photographed before it is eventually used. The storage and finishing guide covers transport, display, and the difference between a dry surface and trapped moisture.
05 Flower questions
A few things worth knowing.
What is the easiest flower soap carving?
A broad leaf or graphic sunflower is usually the easiest place to start. Both have a strong outer shape and can use shallow lines instead of thin, separate petals. A lotus or rose is a good next step when you want to practice layered relief.
How do I carve a flower from a bar of soap?
Choose a firm bar, draw a large simple outline, remove the background first, then lower shallow channels between petals. Keep the center and the base broad, and add only a few lines after the silhouette is sturdy.
Can I use a flower template for soap carving?
Yes. A template helps with proportions, especially when a flower has repeated petals. Print it at a size that leaves a border around the drawing, then simplify any narrow points before carving. Our printable template guide shows how to make the transfer useful rather than rigid.
How do I stop soap flower petals from breaking?
Keep the petals connected to a broad center or base, make the relief shallow, and avoid cutting a deep channel in one pass. Work with a dry, suitable bar and check the side profile before thinning an edge. If a point breaks, round it into the neighboring petal instead of forcing a repair.
What soap is best for flower carving?
A plain, firm, opaque bar is a forgiving starting material because it holds a clean edge and makes the relief easy to see. Test a spare corner first; the best bar is the one that produces a clean curl without force or powder. If the bar smears, choose a broader design or switch materials.