Petal tips crumble.
Round the tip back into the petal, widen its shoulders, and stop deepening that channel. A shorter petal still reads beautifully when the center stays proud.
A field guide for small, good things
Project / Botanical / 25 minutes
Editorial check: 2026-08-31 · Written for general education by Soap Carving Lab. Tools can cut; adults should actively supervise children. This is not professional safety advice.
07 Project / Botanical
Make a quiet lotus from one firm bar. This soap lotus carving lesson keeps the flower broad and low for practicing petal spacing and shadow.
It is soap flower carving as a small bas-relief: raised petals, a lowered background, and soft shadow. Give yourself 25 minutes, leave the center strong, and let slight unevenness make the bloom feel made.
01 Set the bench
Put the towel under the bar before you draw. It stops skating, catches curls, and gives the flower a clean place to rest. Work dry so marks and shallow edges stay readable.
Test the rounded knife on a lower corner first. A good bar gives a thin curl and keeps the edge intact; powder, smearing, or a gritty break means you should lighten the pressure and simplify the petal map. An opaque bar makes the pencil lines and changing shadows easier to see, while a broad face gives the outer rim enough room to support the relief.
Choose a dry bar with a broad face and corners that hold under light pressure.
Use the blunt edge for the background and rim; pressure should stay gentle.
Map the petal pairs lightly so the flower can change before the soap does.
Use the toothpick for veins and the towel for grip, crumbs, and a dry finish.
02 Four calm passes
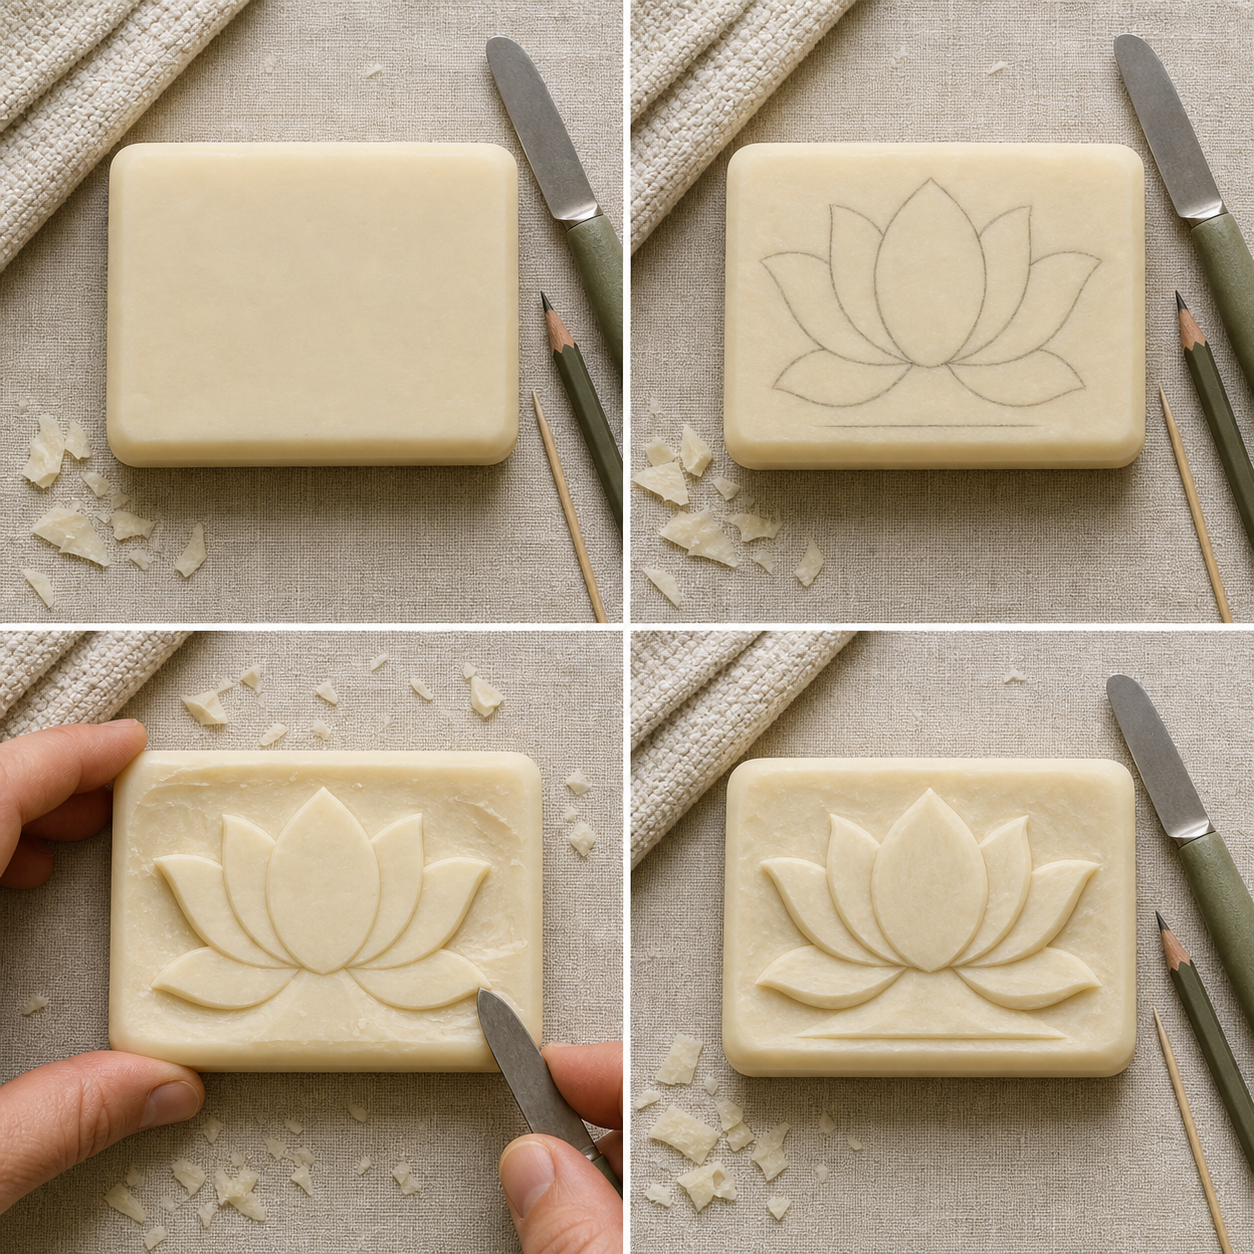
Think of the flower as a low island. The image above is your map; the instructions tell you what to preserve as the waste disappears.
Plain bar / find the face
Pat the soap dry and place its broadest face up on the towel. Test the rounded knife on an edge with a light push away from your fingers; a good bar leaves a thin curl. Keep a finger-width of soap around the lotus for its rim and petals.
Look for: a thin curl, not dust.
Lotus map / draw the rhythm
With the soft pencil, mark a low center oval and three petal pairs: broad outer, middle, and one narrow center petal. Fill two-thirds of the face, leaving a rim. Keep lines light and rounded; the lotus should read layered, not spiky.
Leave: a solid lower edge so it sits flat.
Raised petals / lower the field
Take shallow scoops outside each line with the rounded knife. Cut between petals first, then lower the outside field. Stop after a few millimeters; you only need a shadow. Keep the petal faces and center raised. Rotate the soap, not your wrist.
Remember: light passes protect roots.
Finished relief / soften the edges
Clean the separations with one careful pass. If the soap is sturdy, press a short vein into each middle petal with the toothpick. Tidy the rim and optional waterline, brush crumbs away, and stop when the lotus casts a soft shadow and remains strong.
Finished means: clear at arm’s length and sturdy.
Form note / layers
A lotus relief works because the eye can read three quiet heights: the outer field, the petal layer, and the raised center. The petals do not need to stand high. A clean edge beside a modest shadow is enough to separate one layer from the next, and keeping the center broad gives the whole flower a calm anchor.
Let the center take roughly a quarter of the flower’s width, with the outer petals carrying the remaining space. If the bar is narrow, draw fewer petals and leave a larger rim. If it is broad, add side petals or a low waterline, but keep the lower edge flat and the channels open enough to brush clean. When the relief feels crowded, remove a petal pair before making any groove deeper.
03 Rescue plan
A lotus is forgiving because its identity comes from the layered outline and the raised center. Pause before correcting. Turn the bar, check the shadow, and remove less than you think you need.
If the surface gathers crumbs, brush the field clean before judging the depth. A loose chip should be removed, not pressed back into the relief. Reconnect the neighboring curve with a shallow pass and let that small change become part of the next petal layer.
Round the tip back into the petal, widen its shoulders, and stop deepening that channel. A shorter petal still reads beautifully when the center stays proud.
Deepen one or two background lanes by a tiny amount instead of hollowing the whole face. More contrast usually comes from a cleaner edge, not a deeper flower.
Use the fuller side as your reference and take one matching shallow pass from the other. Do not chase perfect symmetry; a quiet difference makes the bloom feel hand-shaped.
05 Four questions
Start with channels only a few millimeters deep—just enough for the lowered background to cast a shadow. The petal faces should remain broad and strong, and the bar should never feel thin beneath the center.
Six or seven visible petals are plenty for a calm first lotus: two outer, two middle, one center, plus optional side petals. Keep the outline generous and let spacing do more work than detail.
Stop cutting that channel and smooth the break into a shorter petal or a wider gap. Rebalance the neighboring outline only if needed. The raised center and curved lower edge will carry the flower’s character.
Yes, if the bar is firm, dry, and comfortable to handle. Test one shallow curl first; soft, translucent, layered, or heavily gritty bars may smear or crumble, so simplify the flower if the surface fights back.
For an open bloom, widen the outer petals and keep the center low and broad. For a closed bud, narrow the center petals, raise their tips only slightly, and leave more background around them. In both versions, protect the lower edge and keep the petal roots connected; the change in outline should do more work than deeper cuts.
06 The project shelf
When the lotus is resting on its towel, choose the next project by the kind of line you want to practice.
See the full shelf ↗