A wing is too thin
Stop beveling that side. Trim its tip to shorten the lobe, then leave the thicker root untouched. A compact wing still reads beautifully.
A field guide for small, good things
A new animal for the project shelf ↗
Editorial check: 2026-08-31 · Written for general education by Soap Carving Lab. Tools can cut; adults should actively supervise children. This is not professional safety advice.
07 Project / Animal · Easy
Looking for soap carving ideas for a butterfly? Turn one firm bar into a small butterfly with broad wings, a raised body, and just enough pattern to make it feel ready to lift off. This easy animal soap carving keeps the silhouette in charge while your hands learn shallow cuts.
Promise In 25 minutes, you will have a light, friendly butterfly that sits flat, keeps its wing roots strong, and looks good from across the table.
01 Gather / settle
Use a dry, room-temperature bar that holds a corner when you press it. Pale or unscented soap makes your pencil map easy to see and usually shaves into a curl instead of breaking into grit.
Test a small curl along the underside before laying out the wings. If the edge powders, reduce pressure and choose broader curves; if it smears, wipe the surface and let it firm up before marking. A wide, flat bar gives the wings room to balance. Color is welcome, but a plain surface makes shallow veins and the raised center easier to read.
Unscented, dry, and large enough for wide wings.
For shallow outline and shaping cuts.
To map the body and four wing lobes.
For wing veins and two tiny antennae.
For a steady base, grip, and cleanup.
02 The four decisions
Start with the plain bar and work from the outside in. Keep the center thick until the last pass; delicate wing edges still need a strong body to hold.
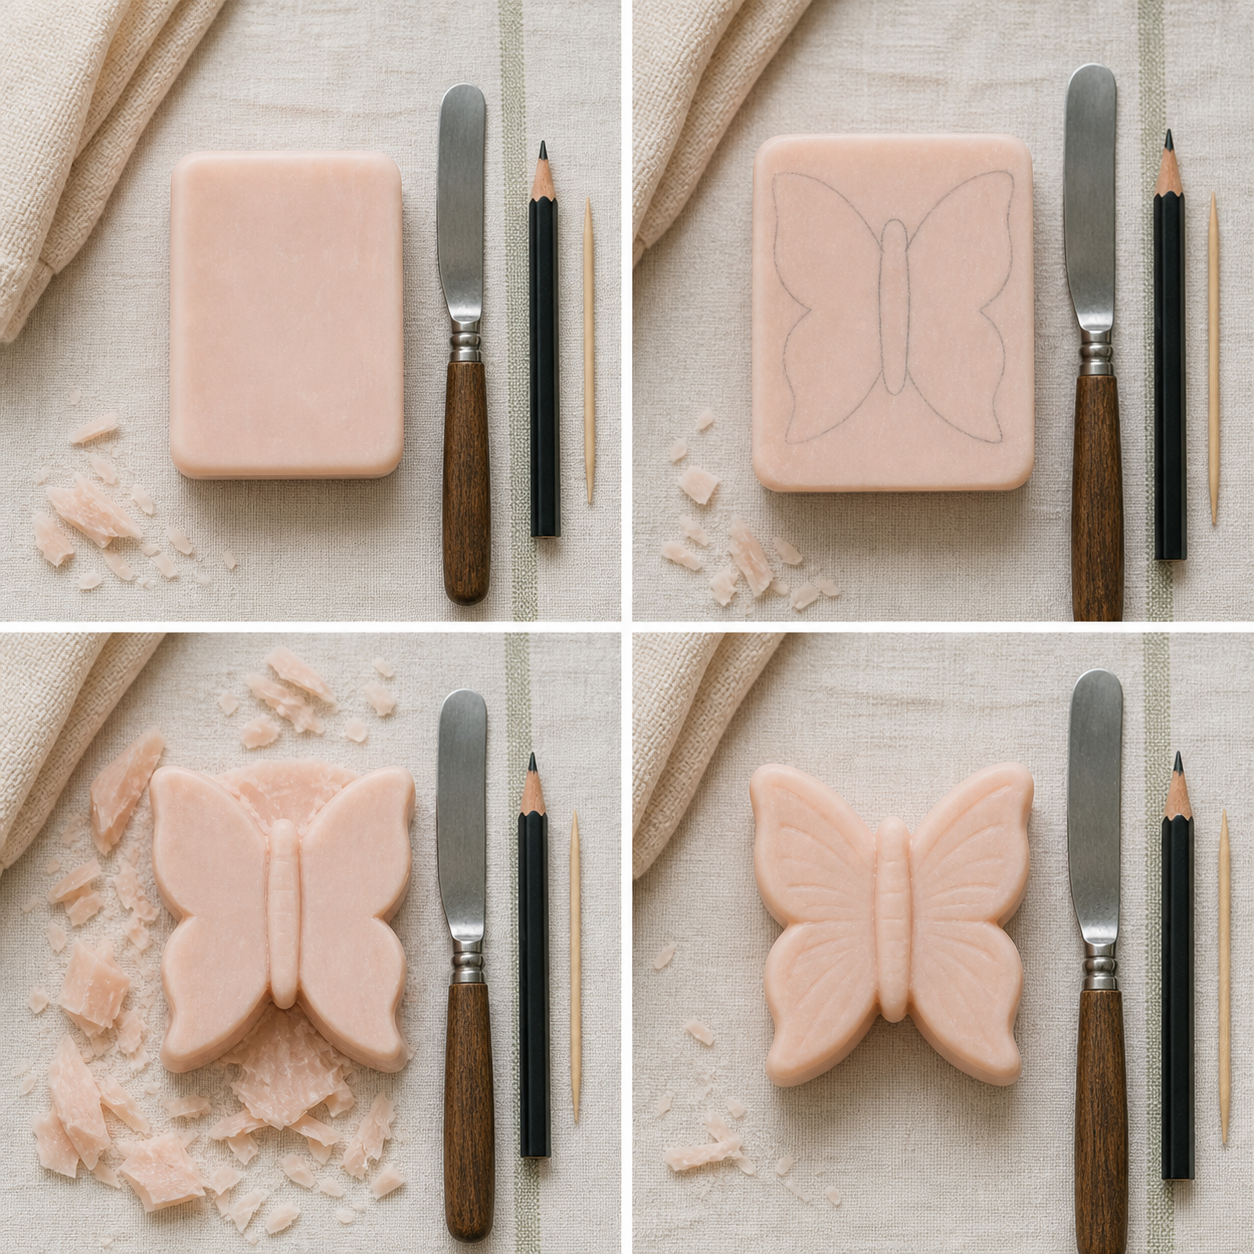
Plain bar / draw the map
On the broad face, draw a narrow center body from top to bottom. Add two large upper wings and two smaller lower wings, keeping the lobes rounded. Leave a finger-width border around the outline and extra soap at the body. The map should fill about two-thirds of the bar.
Silhouette / clear the outside
Use the rounded knife to make shallow cuts outside the pencil line. Remove the four outer corners first, then tidy the arcs from one wingtip to the next. Turn the bar often and keep the full thickness for now. A broad, slightly uneven outline reads more clearly than a thin wing chased into perfection.
Body / raise the middle
Draw a soft line along each side of the body and shave the surrounding wing surface down a little, stopping before the center ridge. Keep the wing roots thick where they meet the body; that is the bridge. Round the outside edges with one light pass, leaving a flat underside so the piece can rest without rocking.
Finished butterfly / add a whisper of detail
With the toothpick, draw two or three shallow lines from the body toward each wing edge. Add a tiny eye mark and two short antennae only if the body feels sturdy. Brush away crumbs, soften sharp corners, and turn the butterfly in the light. Stop when the silhouette and raised center say “butterfly.”
Form note / balance
A butterfly reads through its outline first: a narrow center body, two broad upper wings, and smaller lower wings that give the shape a rhythm. The raised middle is the bridge that keeps the composition together, so leave it wider than the pencil line suggests. Smooth, generous lobes are more convincing than thin points that match a template.
Use the first wing you shape as a guide, not a measuring device. Keep the upper wings about twice the visual weight of the lower pair, and leave extra soap where every wing meets the body. If the bar is narrow, reduce the lower wings or make a moth-like oval; if it is broad, let the outer arcs open farther while keeping a sturdy rim.
03 When a wing answers back
Butterfly wings invite symmetry, but matching every curve can make you cut too much. Pause after each turn. Use the stronger side as a guide for the other.
If a loose flake appears at a wing root, brush it away and inspect the bridge before doing anything else. Widen the body or shorten the wing if needed, then leave the veins alone until the silhouette feels secure again.
Stop beveling that side. Trim its tip to shorten the lobe, then leave the thicker root untouched. A compact wing still reads beautifully.
Do not deepen the grooves. Plane a little soap from the wing surfaces beside the center line so the body rises by contrast.
Brush it clean and keep the two best veins on each side. Empty soap gives the eye somewhere quiet to land.
05 Questions from the bench
Choose a firm, dry bar that gives a little resistance under the knife. Unscented or pale soap is easiest to read, but a colored bar is fine if it shaves cleanly. Avoid wet, crumbly, or layered bars at first.
Draw all four lobes before cutting any of them, and leave a generous border on the first pass. Compare the butterfly from above after each turn. Match the general weight of the wings, not every millimeter of their curves.
About the depth of a strong pencil line is enough. Press lightly with the toothpick until a shadow appears when you tilt the soap. Deep grooves weaken the wing and make it harder to correct a wandering line.
Brush off the curls and let it air-dry overnight on the towel. Keep it somewhere dry and away from a running sink or shower. It is a small sculpture first, so display it where its edges can stay crisp.
Yes. Keep the narrow center and broad wing roots, then change only the outer lobes. Rounded, fuller wings suggest a moth; pointed upper wings make a more graphic butterfly. If the new outline reduces the border to less than a finger-width, simplify the tips before carving and keep the veins to one or two per wing.
06 The project shelf
The butterfly leaves you with a useful trio: silhouette, balance, and light texture. Try another small form while the bar is still on your mind.