Editorial check: 2026-09-11 · Written for general education by Soap Carving Lab. Tools can cut; adults should actively supervise children. This is not professional safety advice.
13 Animal / beginner project
Carve an Owl from soap.
How do you carve an owl from soap? Start with a firm, dry bar, draw a broad front-facing owl, remove the outside in shallow passes, and save the character for a few small marks. This beginner owl soap carving keeps the head and body connected, treats eyes and feathers as surface cues, and leaves a wide base so the finished figure can stand while it dries. Expect a sturdy study, not a professional result.
Begin the six quiet stages ↓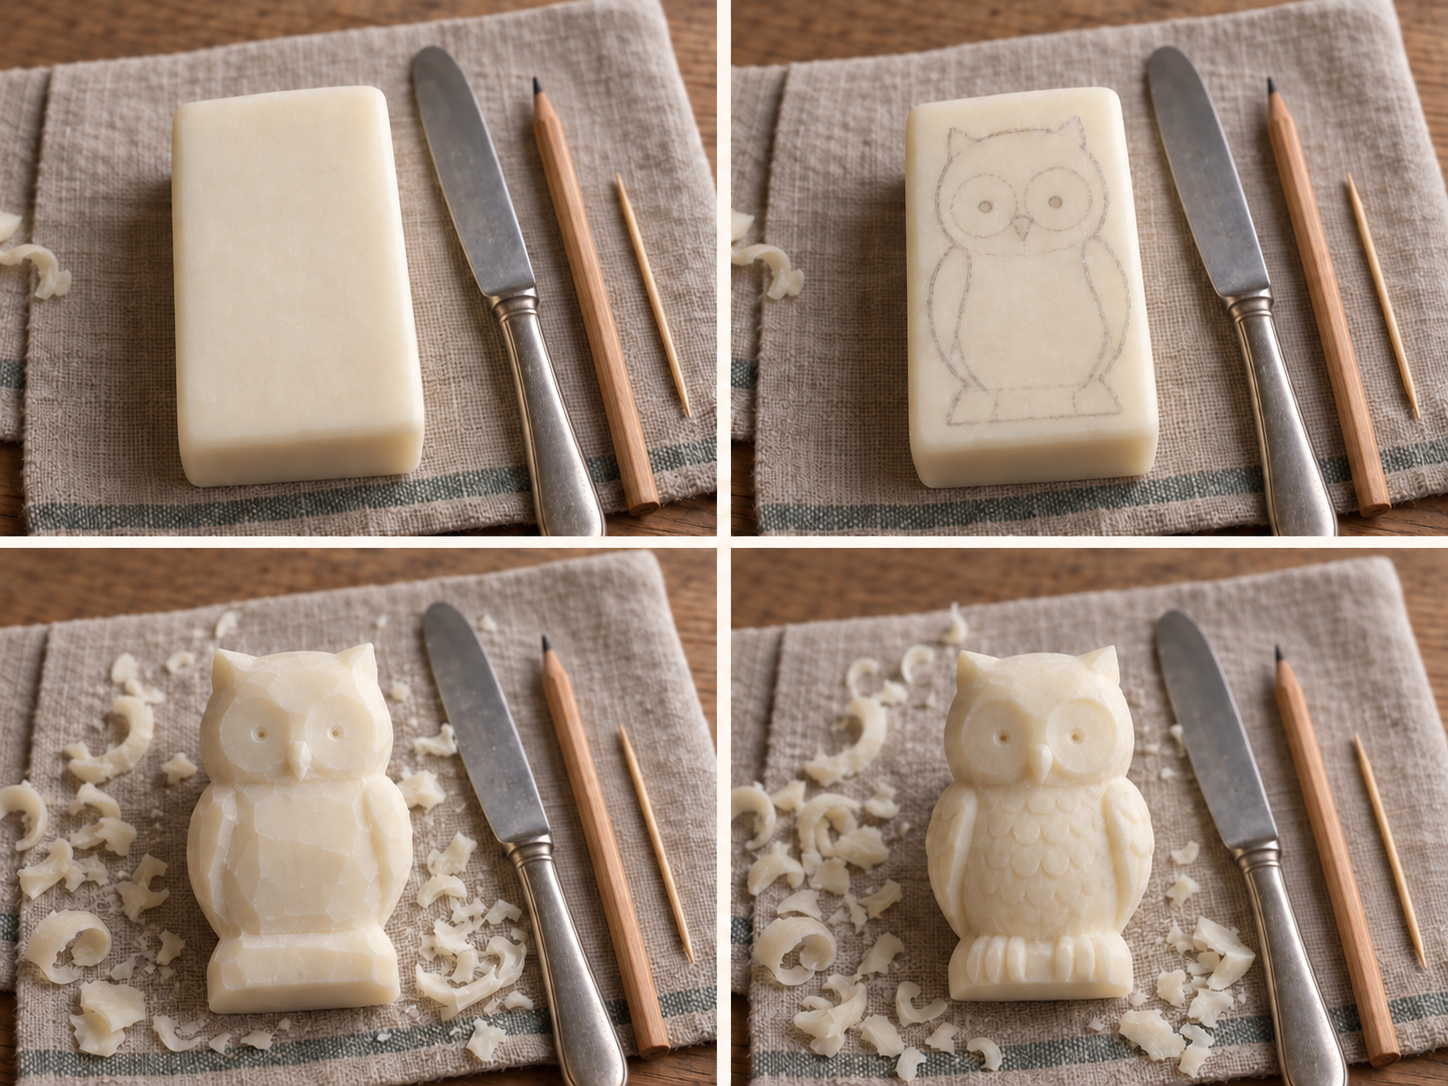
01 Set the bench
Choose a bar with room to breathe.
An owl needs width more than height. Put the broad face up and use the long direction only if the body still has room. A guest-size rectangular bar leaves margin around the tufts and feet. Test an underside curl: a clean ribbon is workable; dust, smear, or force means change the bar or let it dry. See the best soap for carving guide for that test, and animal soap carving ideas for broader shapes.
-
01
One firm, plain bar
Dry, broad, and clean-cornered.
-
02
A rounded butter knife
For controlled, shallow outline cuts.
-
03
A soft pencil
For the front-view map.
-
04
A toothpick or wood skewer
For eye points and a beak.
-
05
A dry tea towel
For grip and dry curls.
02 Six quiet moves
Let the owl appear.
Read the board left to right. Keep the soap on a towel, turn the bar instead of twisting your wrist, and remove less than you think. The soap carving techniques guide covers shallow passes; read the safety guide before any sharper tool.
-
01
Bar / orient
Give the soap a steady start.
Dry the bar and place it flat on the towel, broad face up, with the long axis vertical. Keep the corners. Test one underside curl with the rounded knife. If it comes off cleanly, mark a soft center line so the face and wings stay balanced.
-
02
Pencil map / front view
Sketch a wide-eyed shape.
Draw a broad round head with two small ear tufts, a compact pear-shaped body, short side wings, and a straight bottom band. Fill about two thirds of the face, leaving a generous border between the tufts. Add a center line and two large eye circles as guides, not deep outlines.
-
03
Head and body / block
Remove the outside, not the owl.
Shave the four outer corners first, then work around the pencil outline in thin curls. Keep head and body as one mass; do not cut a neck groove. Turn the bar after each pass and check front and side views. Leave extra soap under the belly and at the tuft bases. Stop when the silhouette reads at arm’s length.
-
04
Face and wings / suggest
Give the face two quiet points.
Use the toothpick to make two tiny, shallow dimples inside the eye guides—just enough to catch a shadow. Deep holes can chip soft soap. For wings, use one curved boundary on each side instead of cutting them free. Keep them attached and thick.
-
05
Feathers / repeat
Build rhythm, not fragile detail.
Use the rounded knife edge or toothpick to make short, overlapping scallops below the eyes and down the belly. Keep marks shallow and spaced; rhythm suggests feathers better than a tight field of cuts. Leave the head smooth and avoid isolated points that can snap.
-
06
Base and finish / settle
Make it stable, then stop.
Flatten the bottom with one or two level passes, keeping a low rectangular or oval foot. Bevel sharp outer edges, brush crumbs away, and inspect the owl from three sides. If it rocks, level the high corner rather than narrowing the body. Let it air-dry on the towel.
Form note / front view
Let the big relationships do the talking.
A front-facing owl is forgiving when level eyes, a centered beak, similar wing widths, and a base wider than the belly are in place. Do not chase perfect symmetry. Compare both sides after each pass and correct the larger difference first. A small beak can read clearly without becoming fragile.
A tall bar supports a watchful owl with longer tufts; a wide bar suits a round chick with tiny ones. If the sketch feels crowded, reduce the wings or move the eyes inward—but do not thin the base for detail. A soap carving owl needs a few clear signals, not a crowded surface. Browse soap carving ideas for another broad shape.
03 Rescue plan
Let the shape stay friendly.
Problems start at thin parts: tufts, wing edges, eye points, and the underside. Broaden the form instead of forcing a repair. The problems-and-fixes guide covers stubborn or chipped bars.
- The bar crumbles.
- Pause, dry your hands, and test a shallower curl. If it powders, choose a firmer bar and redraw broadly.
- A tuft or wing chips.
- Round both sides into a low tuft or attached wing. Remove matching material only if it improves balance; never press the chip back.
- The eyes look too deep.
- Stop poking. Soften the ring with one light pass, then leave two small dimples.
- The owl rocks.
- Mark the high corner and take one thin level pass from the base. Keep the body wide.
05 Six useful answers
Questions from the towel.
What soap is best for owl soap carving?
Use a firm, plain, dry bar with a broad face. An unscented opaque bar is easy to mark; avoid sandy, waxy, wet, or crumbly bars. The best soap for carving gives a clean curl with light pressure.
Can beginners carve an owl with a butter knife?
Yes, for broad silhouette cuts and shallow wing boundaries. Keep the bar on a towel, use short passes, and stop if it slips or needs force. A specialist gouge is not required.
How deep should owl eyes and feathers be?
Keep both shallow: eye points are dimples that catch light, and feather marks are repeated surface texture. Deep holes and narrow cuts make the owl fragile.
How do I keep the owl standing?
Leave extra soap under the belly, flatten the bottom early, and make the base wider than the body. If it rocks, level the base; do not narrow the body.
What if my owl looks like a cat?
Check the beak, eyes, and wing boundaries before adding texture. A centered beak, level eyes, broad belly, and side wings usually read as owl; remove ear points if the shape looks feline.
Can kids do this beginner owl soap carving?
Children need active adult supervision from tool choice through cleanup. Use a rounded tool, work on a table, set a stop signal, and never leave a child alone with a knife or pointed pick. Read the safety guide first.
06 The project shelf
Keep making small forms.
Once the owl is resting, choose a project by the kind of line you want to practice next.
See all projects ↗