01 Before you choose
The best idea starts with the material, not the picture.
Start with easy soap carving designs that fit the bar: “soap carving ideas” can mean a quick first project, a form to copy from a template, an activity for a shared table, or a design that looks good from more than one side. Those are different jobs, and the same bar will not be equally good at all of them.
Start by asking what you want to learn. A flat leaf teaches you to protect a border and make one clean centerline. A fish asks you to rotate the bar and keep a profile readable. A layered flower teaches you to create depth without making every petal paper-thin. When the purpose is clear, choosing between dozens of pretty images becomes much easier.
minutes for a broad heart, leaf, or first relief
minutes for a profile, texture, or graphic flower
minutes for layered petals and a slower finish
For an easy soap carving idea, look for four signals: a strong outline, a broad connection between parts, room for a pencil border, and a finish that does not depend on perfect symmetry. Long thin points, isolated legs, deep openings, and tiny repeated marks can all be beautiful, but they are better treated as a second or third project.
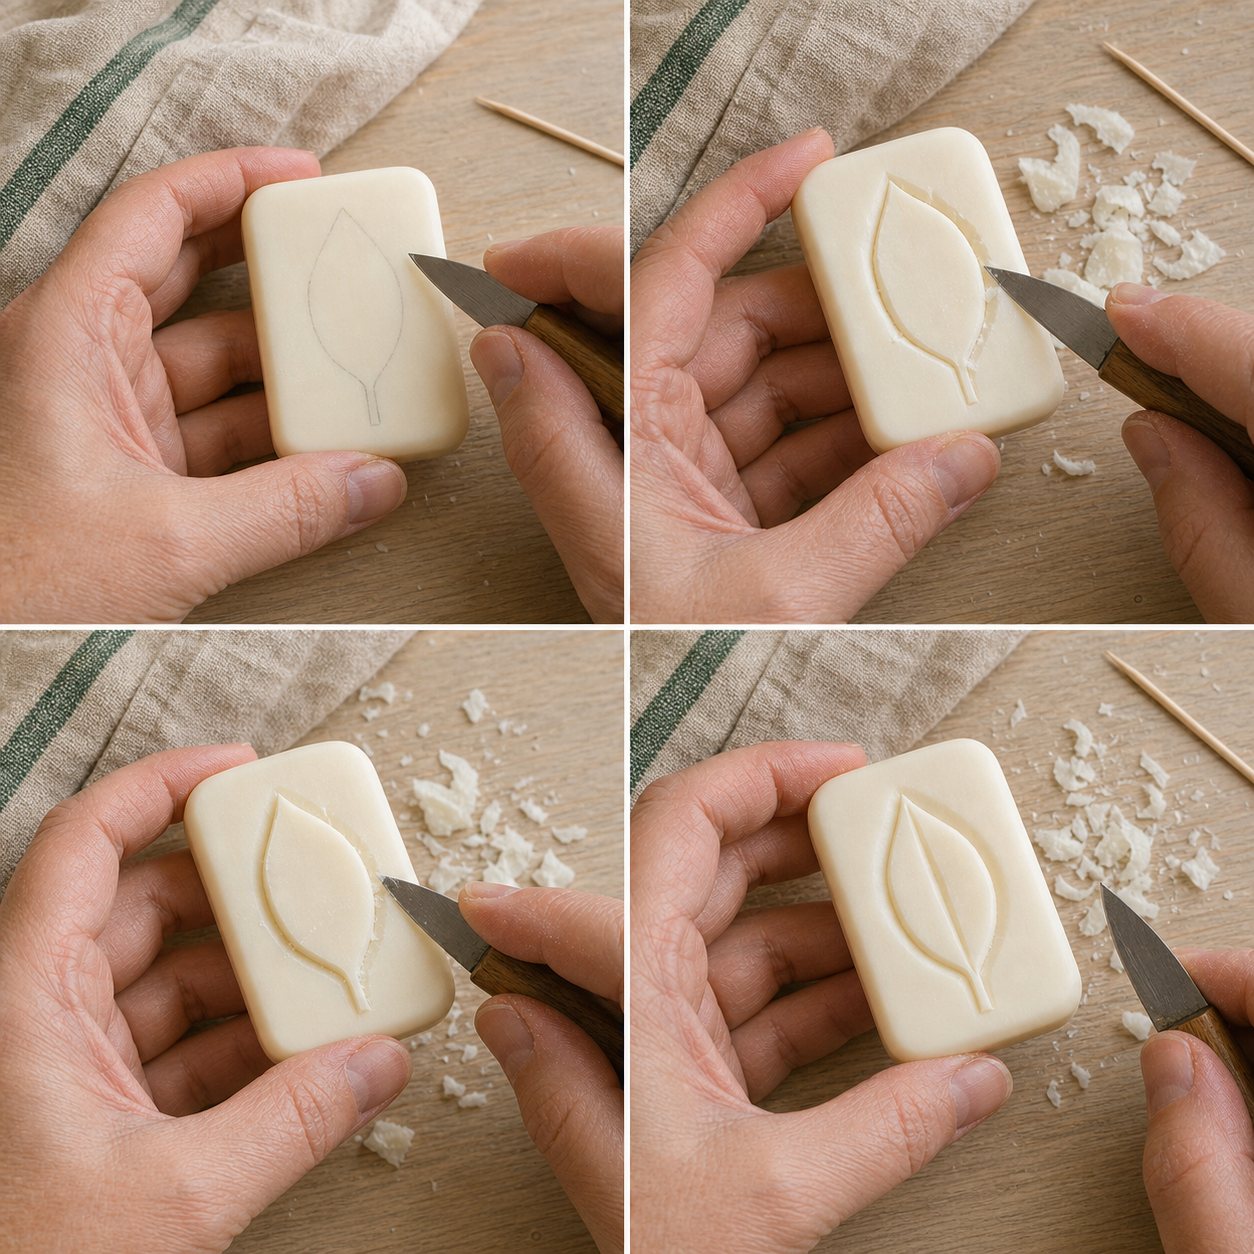
Use a broad outline and one center vein to learn how little detail a strong silhouette needs.
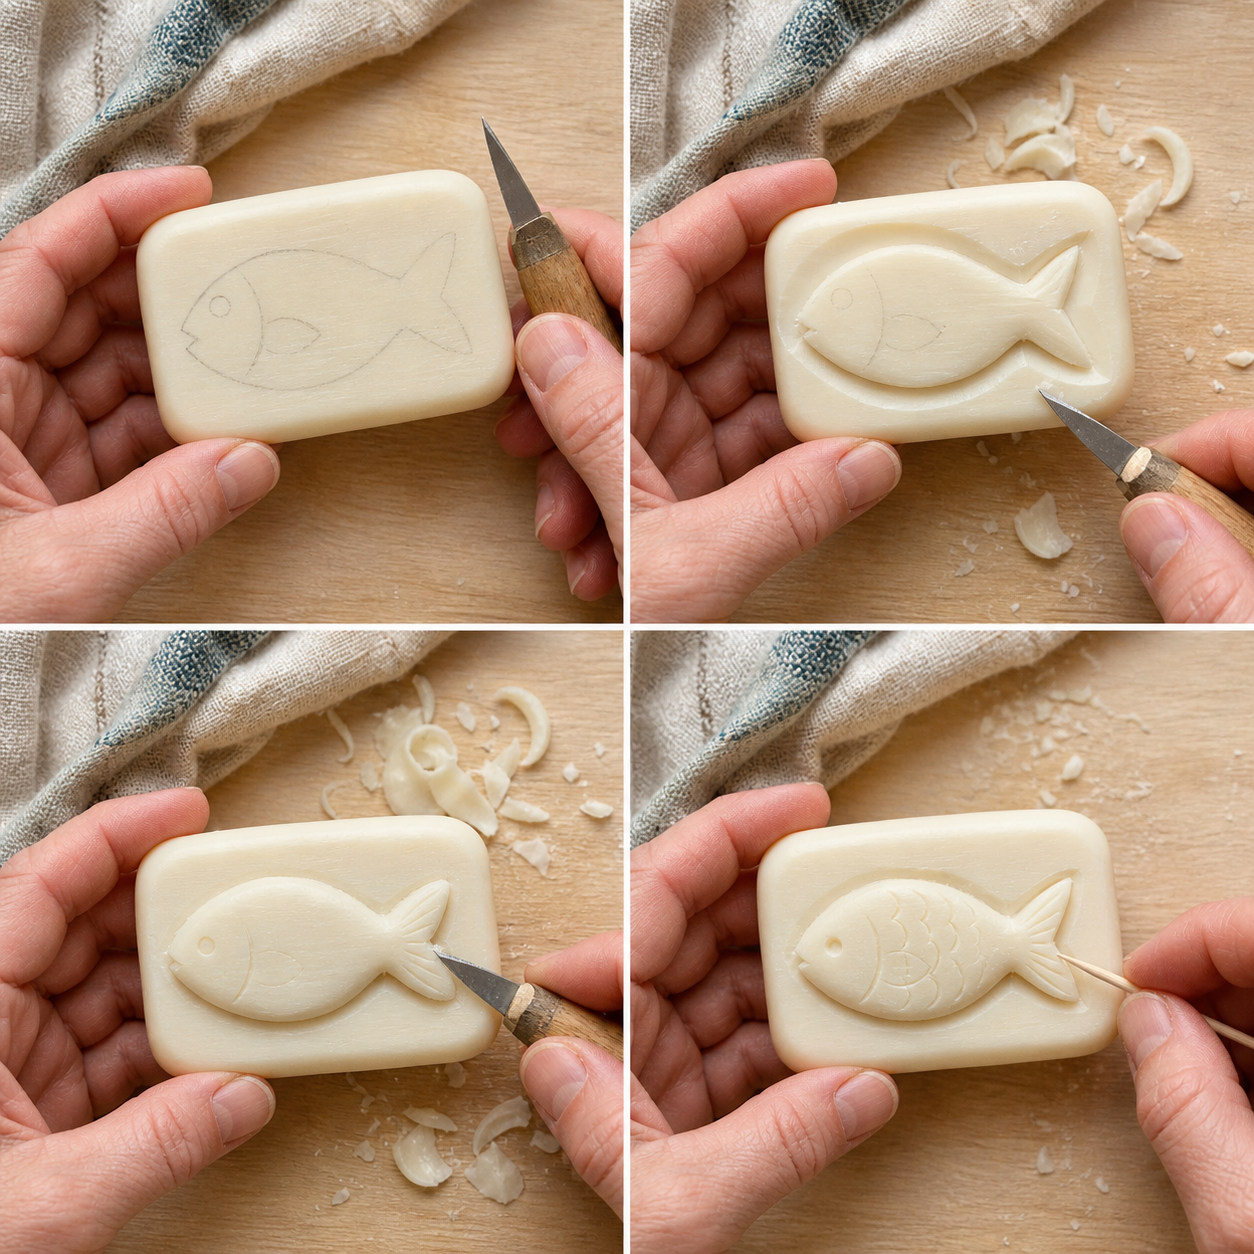
Build the profile first, then add only the marks that help the eye read the form.
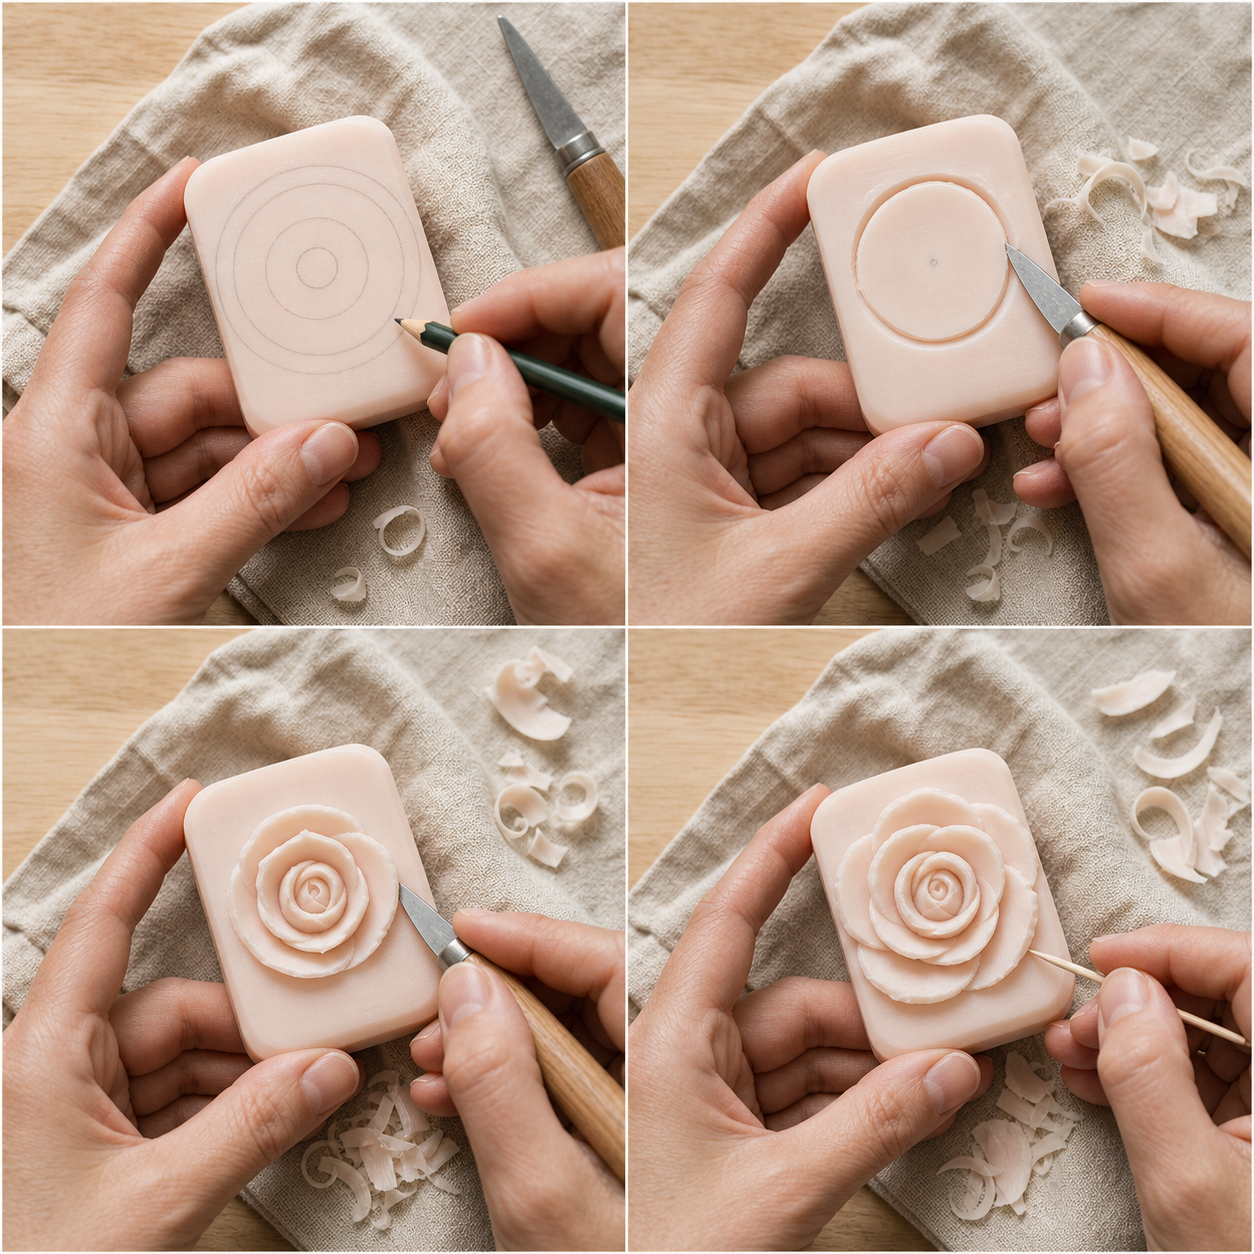
Rings and shallow ledges create depth while the broad base keeps the carving useful.
02 Twelve forms to try
Start with a shape that has a job.
These soap carving ideas are arranged by the kind of attention they ask for, not by how impressive the finished photograph looks. Open a project when you want exact steps; use the short notes here when you are deciding which direction feels right.
The forgiving leaf.
The best first choice when you want a simple, recognizable form. Keep the outer edge broad, carve the waste around it, and finish with one center vein rather than a forest of details.
A pocket heart.
Two rounded lobes and one point make a clear drawing exercise. It is forgiving when the sides are not identical, which makes it a useful lesson in stopping before symmetry becomes pressure.
A pocket fish.
Choose this when you want to move from a flat relief toward a small sculpture. Protect the body and tail first; an eye, fin line, and a few scales are enough to make the idea readable.
A simple snowflake.
Six directions give this design a natural map. Mark the center and large branches first, then keep the cuts shallow so the negative spaces do not weaken the bar.
A graphic sunflower.
A strong center and broad petals make a cheerful design without requiring realistic botany. Use repeated shallow cuts only after the main circle and outer silhouette are stable.
A simple butterfly.
Mirrored wings make this a gentle exercise in balance and negative space. Leave the body thick, draw both sides before cutting, and let the wings stay graphic instead of fragile.
A quiet cat.
Pointed ears provide character, but they also need a generous base. Work from the profile outward, round the cheeks, and skip tiny whiskers until you know how your soap holds a point.
A friendly dog.
The muzzle and floppy ears make a readable form from a few broad planes. Keep the body sturdy and treat the face as a suggestion; volume matters more than a catalogue of features.
A friendly turtle.
A turtle gives you a broad shell and low, repeated texture. Carve the shell as a stable dome, leave the feet thick, and use shallow marks that follow the shape rather than crossing it.
A shallow lotus.
Layered petals are a good next step after a leaf or sunflower. Build the outside shape first, lower the spaces between petals gradually, and leave a generous center so the relief stays calm.
A rose in three layers.
Choose this when the pleasure is in a slow sequence of curves. Three readable rings will look more convincing and remain stronger than many thin petals cut in a rush.
A little pumpkin.
Ribs do the visual work here, so you can let the surface keep a handmade rhythm. Round the mass before adding grooves, and do not worry if every rib is not the same width.
03 Choose by intention
Let the reason choose the form.
The same design can be easy for one maker and frustrating for another. A person practicing clean outlines should not start with a layered rose just because it looks beautiful, and a child’s classroom project needs a different kind of success than a quiet weekend study.
| If you want to… | Start with… | Why it works | Next useful read |
|---|---|---|---|
| finish one thing today | heart or leaf | Broad silhouettes, few fragile points, and a clear stopping place. | first cuts |
| learn a small 3D profile | fish or turtle | Turn the bar often and compare the face, side, and end views. | techniques |
| practice repeated texture | sunflower, lotus, or rose | Use a stable base first, then add only the marks that support depth. | tool choices |
| make a shared or seasonal activity | snowflake or pumpkin | Strong graphic shapes are easier to explain, trace, and adapt. | kids and classroom |
There is no reward for choosing the most complicated shape first. An idea becomes useful when it gives you a manageable sequence: draw, remove, inspect, and stop. If you are unsure, begin with the leaf or heart, then use what you learn from the first bar to choose a form with one additional demand.
04 From inspiration to bench
Turn a picture into a plan.
A reference image is not a promise that your bar should look identical. It is a way to notice the large decisions: where the outline turns, which areas sit high, and how much empty material keeps the object strong. Use the image to simplify, not to create a second job for yourself.
Choose the material
Test one curl before the design.
Put the bar on a dry towel and shave a spare corner with a rounded tool. A clean curl that holds together is a useful sign. If the surface smears, powders, or needs force, switch bars or choose a broader relief. The best soap guide explains what to look for before you commit to a pattern.
Simplify the picture
Keep the outline and remove the noise.
Reduce the reference to one main silhouette, one raised area, and one or two marks. A leaf can lose its tiny veins. A fish can lose its scales. A rose can become three rings. If the design still reads from across the table, it is ready to draw.
Make the map
Leave a border you can trust.
Use a soft pencil on the broadest face and leave room around the shape. Templates are especially helpful when you are learning proportions; use the printable template guide to transfer a design without cutting through the edges of your bar.
Remove the outside
Let every pass have one job.
Clear the corners and lower the waste around the outline in short, shallow passes. Keep the tool moving away from your supporting hand, brush away crumbs, and check the shape from more than one angle. The techniques guide gives the full order of cuts.
Stop and record
Photograph the useful part.
When the silhouette is clear and the important edges are sturdy, stop. Take one photograph from the top and one from the side. Note what the curls looked like and which mark was hardest. That small record turns a single project into a better starting point next time.
For a flat relief
Keep the base broad, draw on the largest face, and think in height changes: background, raised shape, shallow detail. A relief is a particularly kind way to test an idea because the bar does not have to carry a separate foot, tail, or underside.
For a small sculpture
Protect the silhouette from every side. Turn the bar after each major change and leave bridges between parts. A profile that looks charming from the front can become weak from the end, so side checks are part of the design rather than a final inspection.
05 Keep the route connected
A good idea is a doorway.
You do not need a new article for every small variation of a shape. Once you have chosen a form, follow the question that appears next. That keeps the reading useful and gives the project somewhere to go after the inspiration has done its job.
Learn the first cuts.
Set up one bar, draw a broad map, and finish a small form without rushing the details.
Open the beginner guide ↗02 / PatternsUse a printable outline.
Trace leaves, fish, hearts, flowers, and simple graphic reliefs at a size your bar can carry.
Browse the templates ↗03 / EquipmentChoose a smaller kit.
Match the tool to the mark you need, beginning with familiar objects you can control.
See the tool guide ↗04 / SetupKeep each cut quiet.
Make the work area stable and decide which tools belong in an adult-led or child-led session.
Read the safety guide ↗05 / RescueWhen the bar gets stubborn.
Cracks, crumbs, softness, and broken points can often become a different version of the same idea.
Open the rescue plan ↗06 / FinishLet the carving rest.
Dry, photograph, store, and display a small soap sculpture without trapping moisture.
Finish the piece ↗07 / Flower formsExplore flower soap carving.
Compare petal shapes and choose a flower project that fits the bar.
Open the flower guide ↗08 / Three-dimensional formMove beyond the outline.
Learn how to plan a small sculpture that reads from more than one side.
Read the soap sculpture guide ↗06 Fresh project prompts
Choose a new shape for the bench.
The newest project pages keep the same rule as the rest of this soap carving ideas guide: one clear silhouette, one manageable challenge, and enough material left to finish safely.
Carve a whale.
A long body and broad tail make a friendly next step after fish or dolphin.
Read the whale tutorial ↗Animal / broad profileCarve an elephant.
Practice a thick trunk, large ear and stable legs without tiny details.
Read the elephant tutorial ↗Seasonal / layered reliefCarve a Christmas tree.
Use broad tiers and shallow branch lines to make a seasonal form that stays strong.
Read the tree tutorial ↗06 Questions before you cut
A few things worth knowing.
What is the easiest soap carving idea for beginners?
A leaf or a heart is usually the easiest place to start because both have a strong outline, a broad base, and very few fragile points. A fish is a good next step when you want to practice a small three-dimensional profile. Choose the form that teaches one new movement, not five.
How do I choose a soap carving design?
Choose by the skill you want to practice, the time you have, and the firmness of your bar. Broad reliefs such as leaves, hearts, and snowflakes are forgiving; animals and layered flowers ask for more checking from the side. The right design is the one whose stopping point you can describe before you begin.
Can I use a template for soap carving?
Yes. A template is useful when it gives you a clear silhouette without forcing you to copy every detail. Print it at a sensible size, leave a border of soap around the outline, and use the pencil map as a guide rather than a contract. If the printed shape is too narrow for your bar, enlarge or simplify it before cutting.
What should I carve if my soap is soft?
Use a broad, shallow relief with rounded corners and no thin projections. Reduce pressure, keep the bar dry, and test a spare corner before committing to a detailed design. If it smears, switch bars or simplify the shape. The problems and fixes guide can help you tell softness from a technique issue.
Is soap carving safe for children?
It can be a useful supervised activity when an adult chooses the tools, controls the cutting setup, and stays actively present. Start with firm soap, broad templates, and rounded tools; use the safety guide and kids guide for the full setup. Soap chips are not food, and the work should happen at a stable table rather than on a lap.
How do I preserve a soap carving?
Keep the finished carving dry, away from standing water, steam, and direct heat. Photograph it from the front and side, then store it on a breathable surface rather than sealing a damp bar in a closed container. See how to store and finish soap carvings for display and transport ideas.